Perfect Week to Make Homemade Biltong
Sainsbury’s have their Beef Roasting joints half price again, over the Easter Period, so it’s a perfect time to grab yourself some, and knock up some delicious home-made biltong.
I wrote this recipe a couple of years ago, based on extensive research, before making my own biltong for the first time — it was a massive success, and made absolutely perfect biltong — I’ve made it several times since then, and haven’t had to alter the recipe a bit.
The real things to keep an eye on, are don’t leave it in the salt mix for a minute longer that required, make sure the salt is thoroughly rinsed off with the re-used vinegar solution, and keep an eye on the drying times.
I use a fan-assisted oven, that will run at very low temperature — monitored with a room thermometer — keeping the temperature around 32 degrees C, and no more than 35. The door is left an inch or so ajar, for better ventilation. I only run the oven in the evenings and at night, leaving it off during the day. It takes about 6 days of this to dry it out — it should be *just* a little soft when you squeeze it — not rock hard. Don’t be afraid to cut pieces open and look at them. It really depends on how dry you like your Biltong — it’s really difficult to cut when completely dry, but no less delicious.
Hearty Beef, Mushroom and Ale Stew with Fluffy Dumplings
Winter is upon us, the nights are short, the days are cold. It’s the perfect time for a warming, tasty and cheap to make stew. I’m including approximate costings, based on Sainsbury’s prices (plus beef from the local farmers’ market) at time of writing.
These quantities will make about 10 or 11 portions. Serve with hot buttered mashed potato, or parsnip and potato mash.
Preparation time: 45 minutes. Cooking time: 30 minutes + 2 hours in the oven, Gas 2 / 150 °C / 300 °F
Special Equipment:
1 large heavy casserole dish, approx 6 litre. The 28cm round cast iron Le Creuset is ideal, or any other large heavy oven proof pan or dish.
Ingredients:
For the Stew:
- 1.2 Kg / 2.5 lbs Shin of (or other stewing) Beef (preferably good quality, aged beef) (£ 7.68)
- 2 Large Onions, diced or sliced. (£0.50)
- 1 Kg / 2.2 lbs Carrots, peeled and chopped into 1 inch (2 cm) lengths (£ 1.00)
- 25 g pack Merchant Gourmet Mixed Dried Mushrooms (£ 1.60)
- 1×250 g pack Chestnut Mushrooms, quartered. (£1.08)
- 1 litre / 2 pints of your favourite Brown Ale (not too bitter — I used Mann’s Brown Ale, 2 x 500 ml bottles, total cost (£ 3.00);
- 3 Good Quality Beef Stock Cubes (such as Kalo Organic) (£ 0.48)
- 4 tablespoons Geo Watkins Mushroom Ketchup (£0.42)
- 1 rounded tablespoon Dark Brown / Muscavado Sugar
- Good sprinkle Thyme.
- 4 Bay Leaves
- Plain Flour for coating the beef pieces.
- Vegetable oil for frying the meat and vegetables.
Total Stew cost: £15.76. You should get 10 or 11 portions out of this.
For the Dumplings (makes 10 small dumplings. double up if you want more):
2 oz (60 g) Self Raising Flour (£ 0.10)
2 oz (60 g) Fine White Breadcrumbs (about 4 slices of bread, crusts removed) (£ 0.20)
2 oz (60 g) Shredded Beef Suet (£ 0.15)
1 Medium Free Range Egg (£ 0.26)
A little water to mix
Salt, Pepper and thyme (or any other chopped herbs you fancy) to season.
Dumplings cost: approx 71p for 10.
Method:
Soak the dried mushrooms in half a pint of boiling water and leave for at least half an hour, while you prepare the other ingredients.
Cut the Beef into approx 3cm / 1.5 inch chunks, and trim any larger pieces of fat from the meat. The connective tissue will break down during cooking, so only remove any particularly large pieces.
Add a good splash of oil to the casserole dish, and place on a medium-high heat. While the pan is heating, thoroughly coat the pieces of beef in seasoned plain flour. Brown in small batches in the casserole, adding more oil if necessary. This should take a couple of minutes per batch, and require about 3 batches. You’re trying to get a good outer colour on the meat, without actually cooking it too much.
Set the browned meat aside on a plate. Add some more oil to the pan, and add the chopped onions, carrots and chestnut mushrooms. Lightly fry to get some colour into them.
Once they’re browned off, turn the heat down to low, and add the liquid ingredients — both bottles of ale, the soaked dried mushrooms (plus their soaking liquid). Add the thyme, bay leaves, brown sugar, stock cubes, and beef pieces and stir thoroughly. Add enough water to cover everything.
Bring gently up to simmering point on the hob (should take about 15 minutes). Meanwhile, begin to preheat the oven to Gas 2 / 150 °C / 300 °F.
Once the stew is simmering gently, transfer to the oven, on a middle shelf. Cover with a lid, and cook for 1 and a half hours.
After 1 and a half hours, remove the lid, give a brief stir and add the prepared dumplings, cook for a further 30 minutes.
Skim off any fat that’s risen to the surface, and serve with mashed potatoes. Parsnip and potato mash is particularly good with this. An interesting addition to the stew is to put in some green anchovy-stuffed olives just before serving.
Dumplings:
This recipe makes 10 or 11 light, fluffy dumplings. If you prefer heavy stodgy ones, follow the recipe on the Atora Suet packet.
Grate the slices of bread or crumb in a machine until you have fine crumbs.
Combine all ingredients, add enough water (a few tablespoons) to make into a stiff, but quite wet, dough.
Roll in the palm of your hands into walnut sized balls (it helps if you wet your hands first to help stop the mixture sticking) and add to the stew 30 minutes before the end of the 2 hour cooking time, so that the dumplings get half an hour cooking.
Depending on portion size, the whole meal should come out at £1.50 to £1.80 per portion. It will keep for a good few days in the fridge, and can be frozen in individual portions for your own home-made ‘ready’ meal. Compare with supermarket ready meals, where you’re eating salty processed junk, and paying heftily for the privilege.
Biltong Update: Sainsbury’s half-price beef offer on again
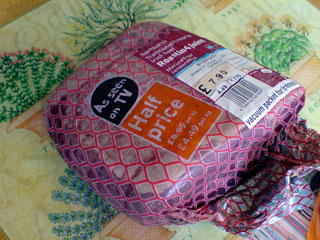
Quick heads-up, Sainsbury’s have currently (and probably for about about a week) got their large beef Silverside vac-packed joints on offer, at half price (£4.49 per Kilo).
Bought myself one of these at the weekend, and am going to do another batch of biltong this week.
Review: Opticron Trailfinder II Monocular. Small is beautiful.
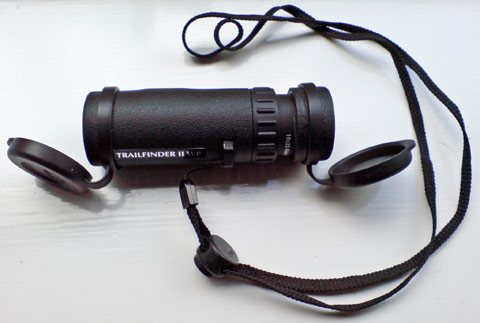
I’ve been using the Opticron Trailfinder II Monocular for a few months now, and it’s really impressed me.
 When out and about, walking, I was finding my compact binoculars were just too heavy — they’d often get left at home and forgotten. Hence my search for something lightweight, water proof and cheap, that I could sling in my pocket. I immediately disregarded the ultra-cheap binoculars, I’ve used a really cheap pair and, frankly, you could hardly see through them.
A bit of searching on the internet, and I stumbled upon a recommendation for buying one of these monoculars — I didn’t even know they existed. The advantage of a monocular is it immediately cuts half the weight of a comparable binocular. The disadvantage is a narrower field of view, but I can easily live with that for the sheer convenience.
I bought a 10×25 unit from Sherwoods Photo, for £30 (free delivery is always a selling feature!) Neither too cheap, or too expensive. The monocular arrived in a couple of days. Once the extra tie-on end cap and strap were fitted, you’re ready to go.
Weighing in at a featherweight 125 grams, with a rubberised case, the build feels solid, and should resist knocks and water. They’re supplied with a case, but it’s frankly a pain to get them in and out of, and rather defeats the ‘grabbable’ purpose. The lens caps fit tightly, defending them from dust and splashes.
Optically, the unit is pretty impressive, with good clarity. Focus is a bit tricky, as it’s by means of a lever arrangement, rather than a wheel. This tends to stick if you haven’t used it for a while, stopping you focussing with one finger. A tiny bit more force, with two fingers, frees it up and then it works very well. The technique I use is to put both middle fingers either side of the lever, allowing a fine degree of control. Focus can still be tricky, but you soon get used to it.
The monocular has a twisting eyepiece, to accommodate spectacle wearers, and this must be twisted out for non-spectacle use. It helps to have fixed the ‘drop-down’ lens caps at the right rotation (see top photo), so that they both hand down when the unit is untwisted.
The neck strap is adequately long, and adjustable. It’s a bit thin, but perfectly usable. The monocular slips nicely into your shirt pocked, with the strap around your neck, for convenient access.
In all, very good value for money and very easy to take out on walks to provide that bit of extra magnification.
Overall, 8/10. Definitely recommended.
Do you drive the Default Car? Why run the Default Browser?
My colleague likes Internet Explorer. There, I’ve said it. It’s probably not his fault, he likes Windows 98 too. Crucially, he doesn’t develop websites, but software drivers. He uses the web as a tool to find information, for entertainment, etc, just like an ordinary user. He doesn’t like Firefox, Chrome, Safara, Opera or any of the other browsers, as IE is the dominant market force. He thinks there’s no point in coding for anything else, as ‘Most people use IE as it’s the default browser’.
As a company, we are developing an increasing number of Web Applications. We need to use technologies such as Ajax, Javascript, JSON, XML, etc to power these systems, and like to give the users a rich user interface, nicely designed, with subtle animation effects that help guide them to choices, respond to them, and generally make their life easier.
Internet Explorer *has* to work for them. Even IE6. This makes twice as much work for us. Nice transparent .PNG file overlays, subtle smooth animations, etc are all impossible in IE. Yes, you can replace the .PNG files with .GIFs for IE6, and yes the animations will work in IE, but you get horrible black borders, the font smoothing breaks and has to be restored after the animation, and the layout gets broken unless you shove in a myriad of custom tweaks for IE6, IE7 and IE8. Great, three versions of the thing to have to cope with.
In the mean time, Firefox, Safari, Chrome, etc are advancing in leaps and bounds. Chrome and Safari now support native CSS3 animation effects, with Firefox bound to catch up in the next version. IE… Nothing. Nope. Can’t do. Load a few hundred K of Javascript and you can get it going. Rounded corners in IE, no problem. Simply code a few tens of lines of Javascript, CSS, create custom image files for every type, poke their layout until it hurts, after a few hours coding per case, there you go. Easy. Oh, you want them against a blue background now? Fine, no problem, I’ll just go and create a new set of images, redo the layout, rewrite half the code…
Firefox and Safari? Er. Really hard. You have to put in a whole one line command in the stylesheet. That takes at least 10 seconds.
Imagine you wanted to buy a new car. You go to SuperCars Showroom where they sell every possible make and model of car. You go in and say “Here’s my money, give me the ‘default’ car”. Ludicrous, in yet that’s what millions of users happily do with Internet Explorer. Large corporations stick to the tried and tested Default Car, because it took them so long to get it working 5 years ago, and they’ve developed lots of highly custom roads to meet its special needs.
Your ‘Default Car’ isn’t bad, it does 0-60 in about 15 seconds, has ‘reasonable’ fuel economy, and handles okay. You need three keys to unlock it, and a code to start the engine, because it’s been made ‘more secure’. Occasionally, whilst driving down a new road, the car will stop and demand several more keys are used to continue. It’s that secure. However, in the bad parts of town, you’re innocently driving along when the car takes control of itself, and drives you straight to the nearest brothel, casino or porn shop. But that’s fine, these things happen, it works most of the time.
Hopefully, as Microsoft’s browser market share continues to fall, Microsoft might be forced to do something. Javascript acceleration, HTML5, CSS3 anyone?
Either that, or every web developer like me will tell Internet Explorer to run Google Chrome Frame and suddenly it’ll work perfectly.
Photoshop Colour Scheme Picker and Automatic Colour Palette Generator
Download a free Photoshop .psd file which generates 4 colour schemes from a single base colour.
As a web designer and developer, I’m constantly on the lookout for simple and effective (and free!) ways of viewing possible colour schemes for a new design, often based on a single ‘key’ colour — eg a company’s logo colour.
This Photoshop file will simultaneously show you four different colour schemes, based around a single chosen colour. Each colour scheme also shows tint and shade variants.
» Download: PhotoshopColourBar.psd
Features:
- Pick a single colour to generate 4 colour schemes — Analogous, Triad, Monochromatic and Complementary.
- Each colour scheme has two tint/shade variants.
- Simple Photoshop File — compatible with Photoshop CS, CS2, CS3 and CS4.
- Small footprint — keep it open whilst you work on you main project.
Instructions:
- Unzip the compressed file somewhere convenient. I keep it in the root of my Clients folder.
- Load the PhotoshopColourBar.psd file into Photoshop.
- Double click on the square solid colour ‘Layer Thumbnail’ labelled ‘Pick a Colour’ , and choose a base colour — either directly or from sampling an image, logo, etc.
- Important: Select the top layer to be able to sample the colours, otherwise Photoshop won’t allow you to use the Eyedropper tool correctly.
A colour-wheel version is available at: http://www.taupo.co.uk/colourdesign.html
Technical:
Colour adjustments are made using successive masked Hue/Saturation adjustment layers.
The tint-shade variants rely on a couple of ‘Reset’ layers to turn any selected shade into the ‘normal’ brightness, fully saturated version. These are then used to generate tinted versions (vertical bars).
homemade biltong update…
The biltong, made two weeks ago, is now almost all eaten. It was absolutely delicious, much much better than I was expecting.
In all, it took five nights in the electric fan oven, running at between 30 and 35°C overnight. I left the oven off, with the door ajar during the day, and ran it from 18:00 to 07:00 each night. A few of the slightly thinner pieces dried quicker, and I removed them when I couldn’t squash them with my fingers.
I wanted the biltong really dry, so allowed a longer drying time. The resulting taste is amazing, far superior to the rather bland shop-bought stuff.
Overall yield was approximately 750g of dried biltong from1,750 g raw meat.
The only problem is it’s quite difficult to slice. A large knife and a steady chopping board are needed to produce wafer-thin slices across the strips.
The next time I catch some beef on offer, I’m definitely doing this again.
Homemade do-it-yourself biltong recipe: part 1, preparation.
Biltong is an absolutely delicious dried beef snack, originating from South Africa. It is, however, very expensive to buy and I’ve been wanting to have a go at making it for a while.
Sainsbury’s helpfully put their Silverside roasting joints on offer at half price, which was too tempting to ignore.
Next problem was locating a suitable recipe – there are a great deal of vague and differing recipes out there. About the only thing that they can seem to agree on is to cut the beef into 1 inch, square cross section, strips along the line of the grain of the meat. Also that coriander, salt, pepper and vinegar are involved.
After distilling them down, here’s the recipe and process followed.
Preparation time: about an hour of work. Three hours of curing time. 2-5 days of drying time.
Rough Ingredients
(doesn’t need to be exact quantities):
- 1.7 Kg Silverside Beef Roasting Joint
- The Marinade:
- 300 ml Cider Vinegar
- 300ml White Wine Vinegar (I decided to mix the two, to tone down the strong cider vinegar taste)
- The Cure:
- 500 g Course Sea Salt
- 200g Demorara Sugar
- 1 tsp Bicarbonate of Soda
- The Coating:
- 1 large handfull Black Peppercorns
- 1 large handfull Whole Coriander Seeds
Total cost of ingredients about £11.00, largely thanks to the half-price beef joint.
Equipment Needed:
- Large, sharp knife.
- Large glass or plastic chopping board
- Grinder / blender / pestle and mortar
- Plastic containers to cure the meat in
- Paperclips (for hanging the strips)
- Kitchen towel.
- drying aparatus / very cool, ventilated oven. Approx 35° C
Preparation:
Blend the Salt, Sugar and Bicarbonate of Soda together.
Pre-grind / crush / mortar the peppercorns and coriander to a course consistency:
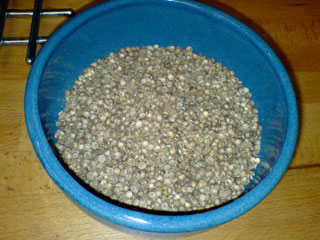
Crushed coriander seeds
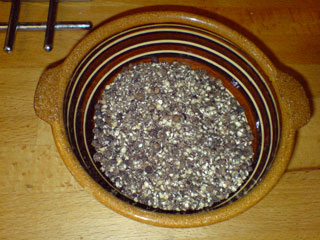
Crushed black pepper
Cut the beef joint into 1 inch (2.5 cm) thick slices, along the length of the grain of the meat:
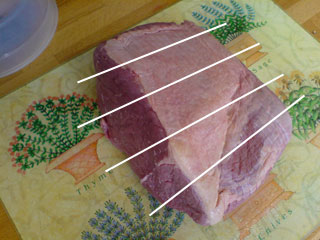 Then cut these slices, again along the lines of the grain of the meat, into approximately 1 inch (2.5 cm) cubic cross-section ‘long chunks’. Trim off any obvious fat or sinew:
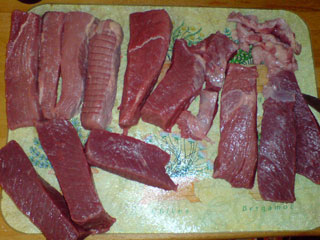
The trimmed pieces of meat, ready for curing.
Place the strips of meat into a plastic container, and cover with the blended white-wine and cider vinegars leave for 30 minutes to steep. The vinegar helps to sterilise the meat, and tenderise it.
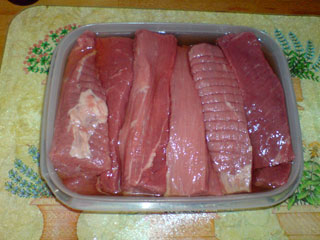
The strips of beef marinading in the vinegar mixture.
After soaking, take the strips of meat out of the vinegar keep the remaining vinegar back, as we’ll be using it again later.
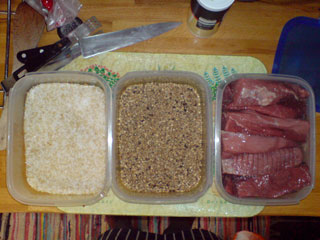
From left to right, the Salt Curing mixture, the spice mixture, and the beef ready to be rolled.
Lightly roll in the peppercorn and coriander mixture. Shake off any excess, and keep the remaining spice mixture for use later too.
Spread a thin layer of the cure (salt/sugar/bicarb mixture) in the bottom of a plastic dish, then lay the strips of meat on top, forming a single layer.
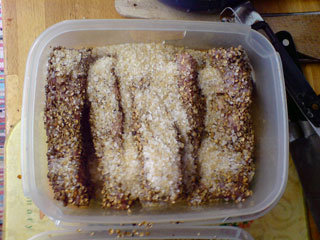
The first layer of spiced and salted strips
Cover the layer of meat with more of the cure, ensuring it covers the ends and sides of the meat, then place alternating layers of meat and cure, with a final covering of cure.
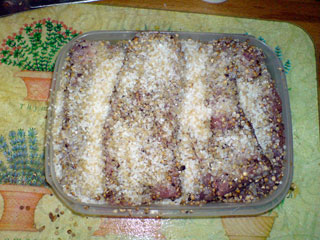
All the meat strips, tightly packed and covered with the curing mixture.
Cover the contaner with clingfilm, place it in a shallow tray, to catch any overflowing juices, and place a board or lid on top, and apply some gentle weight — 4 tin cans should be enough.
Leave to cure for 3 hours (do not leave longer than this or the meat will be too salty).
After this time, remove the meat from the cure, and scrape off most of the salt and spices sticking to the meat. Rinse the meat with the retained vinegar mixture, to remove all of the salt.
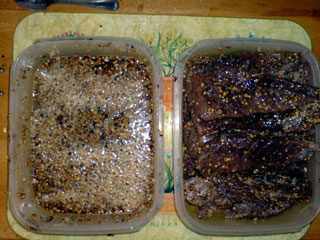
The discarded curing mixture, and cured strips of meat. Notice how dark the meat now is.
Place the meat between pieces of kitchen towel, or a clean tea towel, and dry it thoroughly.
Roll each strip of meat in the remaining spice mixture, pressing it into all the surfaces of the meat.
Take some paper clips, and give them a single ‘unbend’ to a tight S shape, as shown. You could also use wire or string to suspend the meat by. I used plastic coated paper clips to prevent any metal touching the meat.
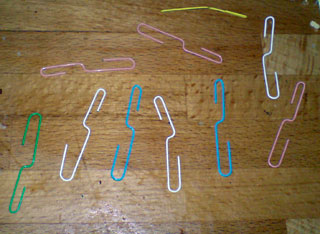
Bent paperclips make the perfect meat hooks
Hook the larger end of the S-shape through the meat, at the thinner end (carefully avoiding poking a paper clip through your fingers), about 1.5 to 2 cm down the strip, to ensure a good hold.
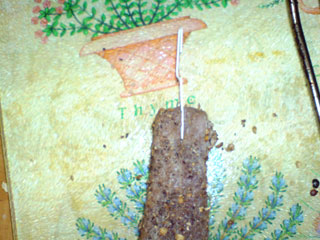
Carefully hook the spiced meat strips onto the paperclips.
Hook all of the meat onto paper clips, then hang them carefully in your drying apparatus. My electric fan oven runs happily at about 35°C in ‘defrost mode’, indicated by a * symbol. I used an electric thermometer to test the temperature. Any hotter than 40°C and the meat will cook rather than dry. There are instructions, elsewhere on the internet, for various drying mechanisms, involving fans and electric light bulbs.
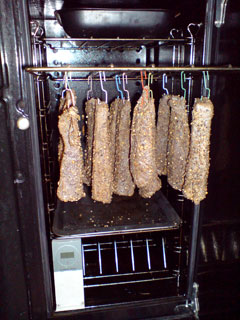
The slices hooked onto a metal oven shelf.
I added a tray of dishwasher (or water softener) salt, previously baked for 20 minutes at 200°C, and cooled. This is placed at the top of the over, to help absorb any moisture.
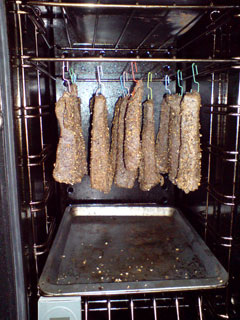
The strips in the oven, ready to begin drying
Place a tray under the strips to catch any drops, or bits of spice that fall off, and start the drying process. Leave the oven door about 1 inch/2cm ajar, to let out any evaporated moisture. I’m running the oven at 35°C all night, and in the evenings, leaving it turned off when I’m at work. It should take about 3-4 days. I’ll post back with progress. It’s done when ‘not squidgy’ to the touch, and feels completely dry and hard.
I started the meat in the oven at 16:00 yesterday, and stopped at 07:00 this morning. The meat felt very dry on the outside, but was quite yielding when pressed. Still needs a fair bit of drying.

